Client onboarding and setup
This reference guide walks through how to setup and configure our environment for a new client onboarding, or to refresh settings for an existing client, either because of a brand update/refresh or other innovation
Internal Systems Setup
Set up time tracking codes in QuickBooks
- Setting up the TSheets time codes is usually done by the Operations manager.
- Adding new clients/tasks (Admin only)
- Log into QuickBooks.
- Select ‘Clients’ in the left pane. This will open the “Manage Clients” pop-up screen.
- To add a new client, click on the blue “+Add” button and enter the name of the Client you want to add.
- Once you have added the client, click into the entry and add the necessary folders and time codes according to the projects agreed with the client.
Brand Templates & setups
- Collect the brand guide and a presentation (PowerPoint / Google Slides) template from the client.
- Using the brand guide / presentation provided, create an CSS file for the client in the Admin Tool and a share a color palette for charting with the Data Scientist, to be added to the rscript as per the below.
CSS files
The admin tool allows for management of client-specific branding through the customization of css files.
To develop a new css file, log into the admin tool and select the css tab.
You can either load an existing css file for testing, delete remote css files, or change the settings and upload/save a new css. The css file needs to be named as the client brand name that will be used across the product suite
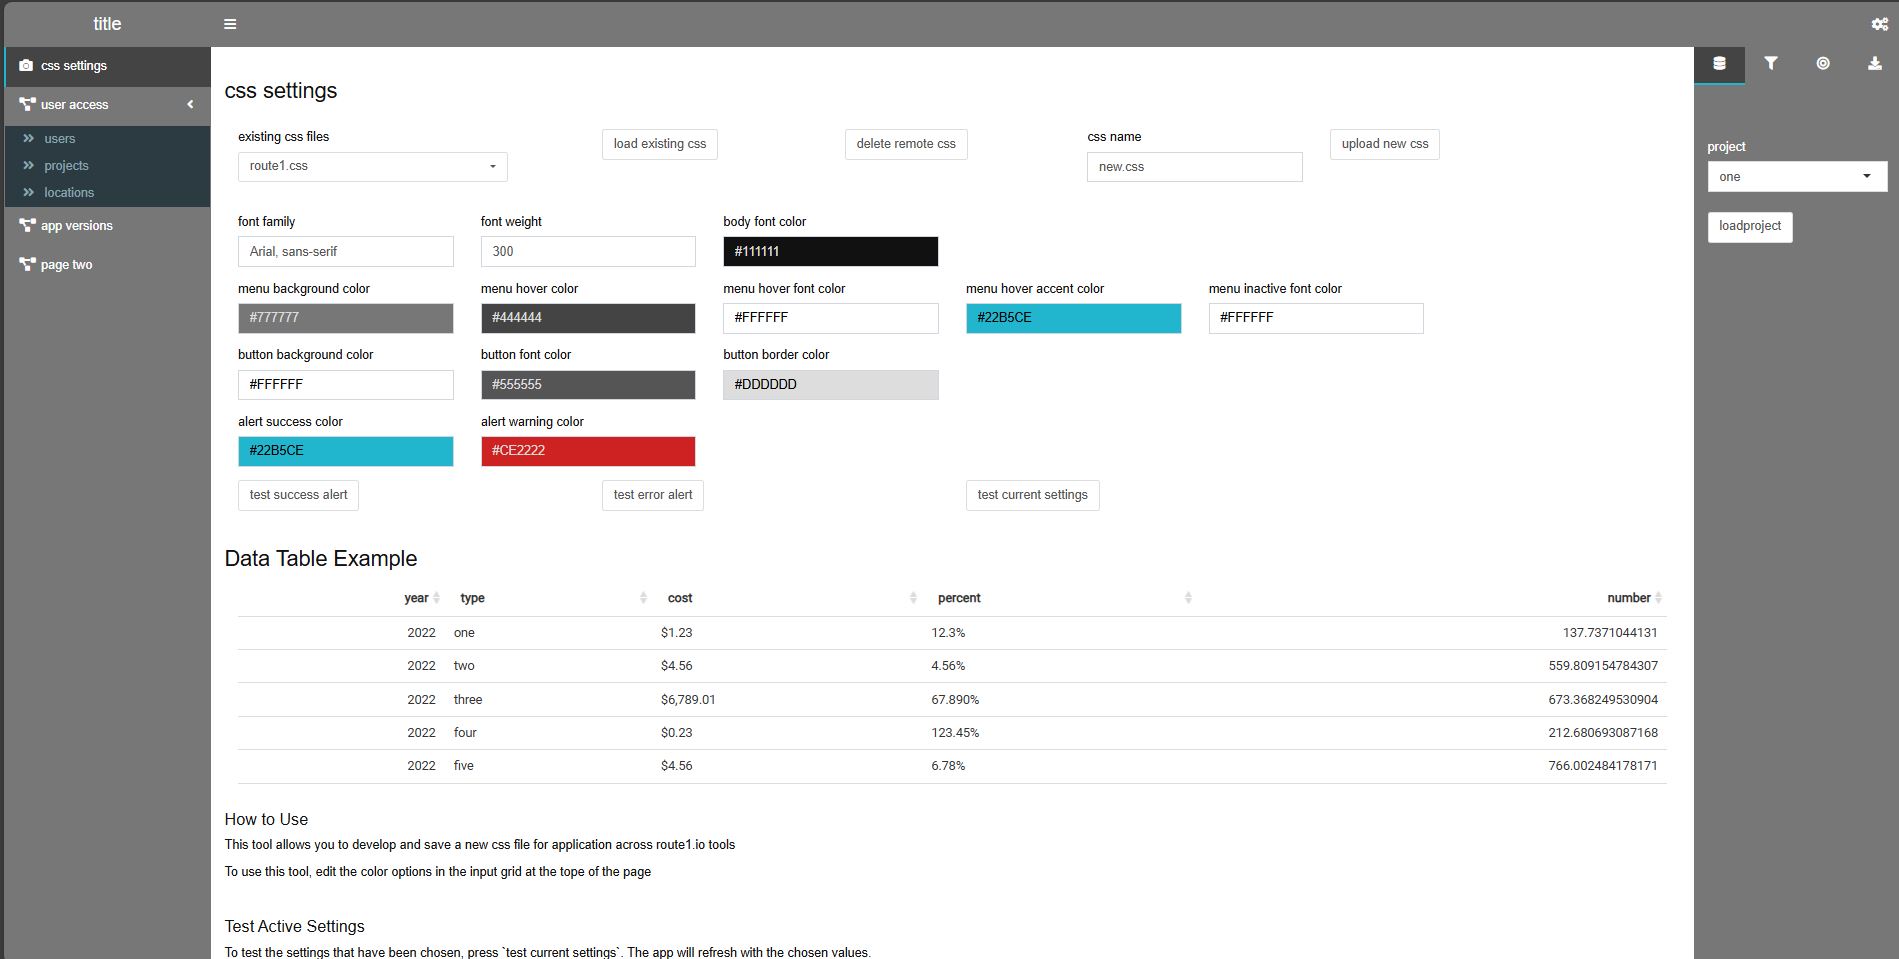
Test Active Settings
To test the settings that have been chosen, press test current settings. The app will refresh with the chosen values.
Be sure to press the ‘test success alert’ and ‘test error alert’ buttons to preview popup dialog boxes
Load Existing css file
To test an already existing css file, select it from the top dropdown and press load existing css
Note: the tool does not currently auto-populate the input boxes with values from the remote css
To find the settings please apply the remote css, run a hard refresh Ctrl-F5 and right click to inspect the webpage
The css file being used can be found named test.css in the Sources menu
Historic CSS files may have different settings & configutation to more recent versions and may need updating
Upload a New css File
Once you are happy with the settings, enter a name for the css file in css name and then press upload new css
This will make the file available across all apps
Delete Remote css File
If you need to delete a css file from the server, select it from the drop-down and press delete remote css
Please note, if that css file is used in other applications it will cause those applications to break
The css files are not actually deleted, but moved to a backup location that needs to be manually restored
They can be restored from the css/deleted s3 bucket
Setting Brand Colors
The brand colors will be used by all apps in the product suite to ensure that charts are rendered using the client’s brand colors. This makes it easy to put them into presentations or emails.
To set the brand colors, please build a clientname.r file with the below content and color definitions. This should be uploaded into the brand_colors/ directory in the central s3 bucket.
Please ensure that more than 100 colors are available, this can be ensured by making use of the rep() command to cycle through color options
A range of colors should be used that will deliver clear distinction between each series in a chart. If necessary, please use chatgpt or equivalent with a query such as “given these existing brand colors please add 4 more colors that would fit the color palette, and include orange, brown, purple and green options”.
Care should be taken to order the colors in a visually distinct way. Yellow should be deprioritized on the list and used with caution as it often does not display well when presented on screens or in charts with a white background
colors_custom=rep(c("#ce2222", "#22b5ce", "#22ceb5", "#ceb522", "#b522ce", "#444444", "#ff9900", "#ff0099", "#006633", "#660033"),100)Document Storage Locations
Locations and setups to share with the internal project members:
- Set up an internal SharePoint site by following these steps:
- In Microsoft 365, navigate to the SharePoint admin page
- Create a new Team site.
- Select a site name (the Client’s name).
- Set a site owner.
- Add additional site members - all internal members that will be working with the Client.
- Navigate to the new SharePoint site and change any permissions necessary
- Set up a GitHub Repo for the Client.
- Set up the architecture for Central process for the Client.
Locations to share with the internal project members and stakeholders:
- Set up a Shared Google Drive (if applicable).
- In Google Drive, navigate to “Shared drives” in the left pane.
- Click on the “+ New” in the top left corner.
- Enter the name for the Shared Drive (this should follow the format of route1.io:client_name)
- Add additional members to the Shared Drive - all internal members that will be working with the Client as well as the Client team and possibly their Media Agency.
- Set up an s3 bucket for the Client.
Asana Project Management
Please note: The templates for the different types of Asana boards are available in the Asana Template library and will only be accessible to Administrators of Asana.
- Set up all the required Asana boards.
- This could include the following boards:
- Support Board
- Data Collection Board
- Model Development Board
- Geo-lift Test Tracking and Planning Board
- This could include the following boards:
- Add all of the Client’s Asana boards to a portfolio for the Client.
- Share the Asana boards and portfolio with the relevant stakeholders, who could also include members from the Client’s project team.
- Train the Client on how to use Asana, if they will be actively using Asana.
- Asana training resources are also available here:
- route1.io Asana Basics Training
- route1.io Asana Data Collection Training
- Ensure that each project board has all the necessary information included on the overview page:
- Add links to locations in the Key Resources section of the project board
- Add the project brief
- Add project milestones
- Add tasks and subtasks
- Assign tasks (only of these have not already been automatically assigned by the template)